Click here to send us an email. Click here to call us.

Category: Recipes

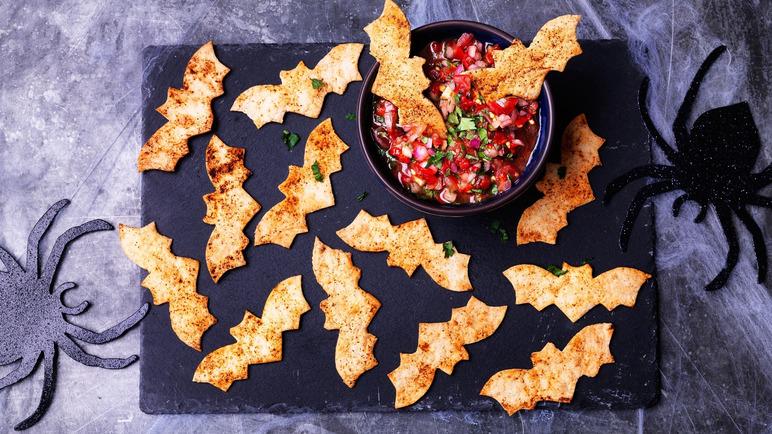
Spooky Season is upon us and what better way to get into the Halloween spirit than with some spooky snacks?

These tasty tortilla bats are scarily delicious. Not only are they delicious but also make for a spooky and playful Halloween treat. Perfect for parties or family gatherings, they’re sure to delight guests of all ages with their eerie charm and fantastic flavour.

Ingredients:

For the Tortilla Bats:

4 large flour tortillas

2 cups shredded cheese (cheddar or a blend)

1 cup cooked and shredded chicken (optional)

1/2 cup black olives, sliced

1/2 cup sour cream (for decorating)

1/4 cup black beans, drained and rinsed

1/4 cup red bell pepper, finely chopped

Cooking spray

For the Tomato Salsa:

4 ripe tomatoes, diced

1/2 red onion, finely chopped

1/4 cup fresh cilantro, chopped

1 jalapeño pepper, finely chopped (adjust for spiciness)

Juice of 1 lime

Salt and pepper to taste

Method:

For the Tortilla Bats:

Step 1 – Preheat the Oven: Preheat your oven to 350°F (175°C) and line a baking sheet with parchment paper.

Step 2 – Cut Bat Shapes: Using a bat-shaped cookie cutter or a paper template, cut bat shapes from the flour tortillas. You can make as many bats as you’d like, depending on the size of your tortillas.

Step 3 – Add Filling: In a bowl, combine the shredded cheese, cooked chicken (if using), black olives, black beans, and red bell pepper. Place a spoonful of this mixture on half of the bat-shaped tortillas.


Step 4 – Top and Seal: Place the remaining tortilla bats on top of the filling. Use a bit of water to help seal the edges, pressing down with a fork to create a decorative edge. This seals in the filling.

Step 5 – Bake: Place the bat-shaped tortillas on the prepared baking sheet. Lightly spray the tops with cooking spray. Bake in the preheated oven for about 10-12 minutes, or until they are golden brown and crisp.

Step 6 – Decorate: Once the tortilla bats have cooled slightly, use sour cream to draw spooky bat faces on top. You can get creative with the expressions!


For the Tomato Salsa:

Step 1 – Prepare the Ingredients: In a bowl, combine the diced tomatoes, chopped red onion, cilantro, and jalapeño pepper.

Step 2 – Add Flavour: Squeeze the juice of one lime over the mixture and season with salt and pepper. Stir well to combine.

Step 3 – Plate: Place your tortilla bats on a serving platter.

Step 4 – Dip: Serve the spooky tortilla bats alongside the fresh tomato salsa as a delicious and fun Halloween snack. Enjoy!

As the colder weather gets closer and the season of comfort food is upon us, what could be better than coming home to a sensational soup?

This homemade tomato soup is a comforting and versatile dish, perfect for warming up on a chilly day or as a quick and easy meal. Customise it to your liking, and don’t forget to enjoy it with your favourite accompaniments!

 Ingredients:

2 tablespoons butter or olive oil

1 onion, chopped

2 cloves garlic, minced

1 carrot, chopped (optional, for added sweetness)

2 (14-ounce) cans of whole tomatoes (or 4 cups of fresh tomatoes, peeled and chopped)

1 (14-ounce) can of tomato sauce

2 cups vegetable or chicken broth

1 teaspoon sugar (optional, to balance acidity)

1 teaspoon dried basil

1/2 teaspoon dried oregano

Salt and pepper to taste

1/2 cup heavy cream or half-and-half (optional, for creamier soup)

Fresh basil leaves or croutons for garnish (optional)

 Method:

Step 1 – Sauté the Aromatics: In a large pot or Dutch oven, melt the butter or heat the olive oil over medium heat. Add the chopped onion, garlic, and carrot (if using). Sauté for about 5 minutes, or until the vegetables become soft and translucent.

Step 2 – Add the Tomatoes: If using whole canned tomatoes, crush them with your hands or a wooden spoon and add them to the pot along with their juices. If using fresh tomatoes, add them now. Also, pour in the tomato sauce.

Step 3 – Season and Simmer: Stir in the vegetable or chicken broth, sugar (if using), dried basil, dried oregano, salt, and pepper. Bring the mixture to a boil, then reduce the heat to low. Cover the pot and let the soup simmer for about 15-20 minutes, allowing the flavours to meld.

Step 4 – Blend the Soup: Using an immersion blender, blend the soup directly in the pot until smooth and creamy. If you don’t have an immersion blender, carefully transfer the soup in batches to a blender and blend until smooth, then return it to the pot.

Step 5 – Add Cream (Optional): If you desire a creamier tomato soup, add the heavy cream or half-and-half to the pot and stir well. Allow the soup to heat through but avoid boiling once the cream is added.

Step 6 – Adjust Seasoning: Taste the soup and adjust the seasoning with additional salt, pepper, or sugar if needed to suit your taste.

Step 7 – Serve: Ladle the tomato soup into bowls. Garnish with fresh basil leaves or croutons if desired.

It’s National Curry Week!

To celebrate National Curry Week, this is the best time to share our mouthwatering recipe for a tasty tomato curry…

This tomato curry is a flavourful and comforting dish that’s quick and easy to prepare. The combination of ripe tomatoes and aromatic spices creates a rich and tangy sauce that’s perfect for scooping up with bread or pairing with rice. Adjust the spice level to your liking and savour the delightful taste of this homemade tomato curry. 

Ingredients:

4 large tomatoes, chopped

1 onion, finely chopped

2 cloves garlic, minced

1-inch piece of ginger, minced

2 green chilies, finely chopped (adjust to your spice preference)

1 teaspoon cumin seeds

1 teaspoon coriander powder

1/2 teaspoon turmeric powder

1/2 teaspoon red chilli powder (adjust to taste)

1 teaspoon garam masala

2 tablespoons cooking oil

Salt to taste

Fresh cilantro leaves for garnish

Method:

Step 1 – Heat Oil: Heat the cooking oil in a pan or skillet over medium heat.

Step 2 – Sauté the Aromatics: Add the cumin seeds and let them splutter. Then, add the chopped onion, minced garlic, minced ginger, and green chilies. Sauté until the onions turn translucent and the raw aroma of the garlic and ginger disappears, usually about 3-4 minutes.

Step 3 – Add Spices: Add the coriander powder, turmeric powder, red chilli powder, and a pinch of salt. Sauté for another minute to roast the spices and release their flavours.

Step 4 – Cook the Tomatoes: Add the chopped tomatoes to the pan and stir well. Cook the tomatoes until they become soft and start to break down, about 5-7 minutes. Use the back of your spoon to mash some of the tomato pieces.

Step 5 – Simmer: Reduce the heat to low, cover the pan, and let the mixture simmer for about 10-15 minutes. This will allow the flavours to meld, and the sauce to thicken.

Step 6 – Season: Season the tomato curry with salt and garam masala. Adjust the salt and spice level to your preference by adding more if needed.

Step 7 – Garnish and Serve: Once the tomato curry reaches your desired consistency and flavour, remove it from heat. Garnish with fresh cilantro leaves.

Step 8 – Serve: Tomato curry is excellent when served with steamed rice, naan, or crusty bread. Enjoy!

Mediterranean Stuffed Tomatoes with Quinoa are a flavourful and nutritious dish that can be served as a main course or a hearty side dish. Enjoy the combination of fresh tomatoes, tangy feta cheese, aromatic herbs, and wholesome quinoa!

Not only is this delicious dish visually appealing but also packed with vibrant flavours. The blend of ingredients creates a delightful Mediterranean-inspired dish that’s both satisfying and nutritious.

Ingredients:

  •       4 large tomatoes
  •       1 cup cooked quinoa
  •       1/2 cup crumbled feta cheese
  •       1/4 cup chopped Kalamata olives
  •       1/4 cup chopped fresh parsley
  •       1/4 cup chopped fresh basil
  •       2 cloves garlic, minced
  •       2 tablespoons extra-virgin olive oil
  •       1 tablespoon lemon juice
  •       Salt and pepper to taste

Instructions:

Step 1 – Preheat the Oven: Preheat your oven to 190°C

Step 2 – Prepare the Tomatoes: Cut the tops off the tomatoes and set them aside. Carefully scoop out the pulp and seeds from the tomatoes using a spoon, creating a hollow cavity. Reserve the pulp for later use.

Step 3 – Make the Filling: In a mixing bowl, combine the cooked quinoa, crumbled feta cheese, chopped olives, chopped parsley, chopped basil, and minced garlic.

Step 4 – Prepare the Tomato Pulp: Take the reserved tomato pulp and seeds and gently squeeze out excess juice. Chop the pulp and add it to the quinoa mixture.

Step 5 – Season and Mix: Drizzle the extra-virgin olive oil and lemon juice over the quinoa mixture. Season with salt and pepper to taste. Gently mix all the ingredients until well combined.

Step 6 – Stuff the Tomatoes: Using a spoon, stuff each hollow tomato with the quinoa mixture, pressing it down gently to pack it.

Step 7 – Replace the Tomato Tops: Place the tops of the tomatoes back on, creating a lid for the stuffed tomatoes.

Step 8 – Bake: Place the stuffed tomatoes in a baking dish or on a baking sheet. Bake in the preheated oven for about 20-25 minutes, or until the tomatoes are softened and the filling is heated through.

Step 9 – Serve: Carefully transfer the stuffed tomatoes to serving plates. You can remove the tomato tops before serving or leave them on for presentation. Drizzle with a little extra olive oil and sprinkle with additional chopped herbs if desired.

These Tomato and Mozzarella Panini are a delightful combination of flavours and textures. The juicy tomatoes, creamy mozzarella, and fragrant basil create a harmonious taste that’s enhanced by the crispy, toasted bread. Whether enjoyed as a quick lunch or a satisfying dinner, these panini are a treat for your taste buds.

Ingredients:

  •       4 ciabatta rolls or slices of rustic bread
  •       2 medium tomatoes, sliced
  •       8 ounces fresh mozzarella cheese, sliced
  •       Fresh basil leaves
  •       2 tablespoons balsamic glaze (optional)
  •       2 tablespoons olive oil
  •       Salt and pepper to taste

Method:

Step 1 – Preheat the Panini: If you’re using a panini press, preheat it according to the manufacturer’s instructions. If using a pan on the hob, heat it over medium-high heat.

Step 2 – Assemble the Panini: Slice the ciabatta rolls in half if they’re not pre-sliced, layer the mozzarella slices on one side of each roll, arrange the tomato slices on top of the mozzarella, place fresh basil leaves over the tomatoes, drizzle a little balsamic glaze over the basil if desired, season with a pinch of salt and pepper.

Step 3 – Close and Brush with Olive Oil: Close the sandwiches with the other halves of the ciabatta rolls. Brush the outer sides of the sandwiches with olive oil. This will help the bread get crispy and golden when grilled.

Step 4 – Grill the Panini: If using a panini press, place the assembled panini onto the preheated press. Close the lid and cook for about 3-5 minutes, or until the bread is golden and the cheese is melted. If using a frying pan, place the assembled panini onto the hot pan. Use a heavy skillet or a panini press to press down on the sandwiches. Cook for about 2-3 minutes on each side, until the bread is toasted and the cheese is melted.

Step 5 – Serve and Enjoy: Once the panini are ready, remove them from the grill or press. Allow them to cool for a minute before slicing in half. Serve the Tomato and Mozzarella Panini while they’re still warm and the cheese is gooey.

This Margherita Pizza is a timeless favourite that highlights the simplicity and quality of its ingredients. The combination of tomato sauce, fresh mozzarella, and fragrant basil creates a burst of flavours with every bite. Whether you’re making it for a casual dinner or a special occasion, Margherita Pizza never fails to satisfy.

Ingredients:

For the Pizza Dough:

  •       1 pound pizza dough (shop-bought or homemade)
  •       Flour, for dusting


For the Pizza Sauce:

  •       1 can (14 ounces) crushed tomatoes
  •       2 cloves garlic, minced
  •       1 tablespoon extra-virgin olive oil
  •       1 teaspoon dried basil
  •       1 teaspoon dried oregano
  •       Salt and pepper to taste

For the Toppings:

  •       8 ounces fresh mozzarella cheese, sliced
  •       Fresh basil leaves
  •       Extra-virgin olive oil, for drizzling
  •       Salt and pepper to taste


Method:

Step 1 – Preheat the Oven: Preheat your oven to the highest temperature it can reach (usually around 260°C). If you have a pizza stone, place it in the oven to preheat as well.

Step 2 – Prepare the Sauce: In a saucepan, heat the olive oil over medium heat. Add the minced garlic and sauté for about 1 minute until fragrant. Pour in the crushed tomatoes and add the dried basil, dried oregano, salt, and pepper. Simmer the sauce for about 10-15 minutes until it thickens slightly. Remove from heat and set aside.

Step 3 – Roll Out the Dough: On a floured surface, roll out the pizza dough into a circle or your desired shape. If the dough is sticking, you can dust it with a bit more flour.

Step 4 – Transfer to Pizza Peel or Baking Sheet: If using a pizza stone, sprinkle some cornmeal on a pizza peel to prevent sticking. If you’re using a baking sheet, you can place the rolled-out dough directly on it.

Step 5 – Add Sauce and Cheese: Spread a thin layer of the prepared pizza sauce over the dough, leaving a border around the edges. Place the sliced mozzarella evenly over the sauce.


Step 6 – Bake the Pizza: If using a pizza stone, carefully slide the pizza onto the preheated stone in the oven. If using a baking sheet, simply place the baking sheet in the oven. Bake the pizza for about 10-12 minutes, or until the crust is golden and the cheese is melted and bubbly.

Step 7 – Garnish and Finish: Once the pizza is out of the oven, immediately scatter fresh basil leaves over the hot cheese. Drizzle a bit of extra-virgin olive oil over the pizza and season with a sprinkle of salt and pepper.

Step 8 – Slice and Serve: Allow the pizza to cool for a minute or two before slicing it into wedges. Serve the Margherita Pizza while it’s still hot and enjoy the wonderful flavours of the classic combination.

This Caprese Pasta Salad is a delightful fusion of the classic Caprese flavours—juicy tomatoes, creamy mozzarella, and fragrant basil—combined with pasta for a heartier dish. The balsamic dressing adds a tangy and slightly sweet note that complements the ingredients perfectly. Enjoy the harmony of flavours in this simple yet impressive pasta salad! 

Ingredients:

For the Salad:

  •       8 ounces (about 2 cups) cherry tomatoes, halved
  •       8 ounces fresh mozzarella cheese, cubed
  •       1 cup fresh basil leaves, torn
  •       8 ounces pasta (such as fusilli, penne, or farfalle)
  •       Salt for pasta water

For the Dressing:

  •       1/4 cup extra-virgin olive oil
  •       2 tablespoons balsamic vinegar
  •       1 clove garlic, minced
  •       Salt and pepper to taste

Method:

Step 1 – Cook the Pasta: Bring a large pot of salted water to a boil. Add the pasta and cook according to the package instructions until al dente. Drain the pasta and rinse it under cold water to cool it down. Set aside.

Step 2 – Prepare the Dressing: In a small bowl, whisk together the extra-virgin olive oil, balsamic vinegar, minced garlic, salt, and pepper to create the dressing. Set aside.

Step 3 – Combine Ingredients: In a large mixing bowl, combine the cooked and cooled pasta, halved cherry tomatoes, cubed fresh mozzarella, and torn fresh basil leaves.

Step 4 – Add the Dressing: Drizzle the dressing over the pasta salad ingredients. Gently toss the salad to ensure all the components are coated with the flavourful dressing.

Step 5 – Chill and Serve: Cover the bowl with plastic wrap or a lid and refrigerate the Caprese Pasta Salad for at least 30 minutes to allow the flavours to meld together.

Step 6 – Garnish and Enjoy: Before serving, give the salad a final toss. If desired, you can garnish the salad with additional fresh basil leaves or a sprinkle of grated Parmesan cheese for extra flavour.

Step 7 – Serve: Caprese Pasta Salad is perfect as a refreshing side dish for picnics, barbecues, potlucks, or as a light and satisfying main course for lunch or dinner.

This traditional Ratatouille recipe celebrates the natural flavours of seasonal vegetables, resulting in a comforting and nutritious dish that will please both vegetarians and non-vegetarians alike. Enjoy the delightful taste of this French classic!

Ingredients:

  • 1 eggplant, cut into 1-inch cubes
  • 2 zucchinis, sliced
  • 1 red bell pepper, cut into 1-inch pieces
  • 1 yellow bell pepper, cut into 1-inch pieces
  • 1 green bell pepper, cut into 1-inch pieces
  • 1 large onion, chopped
  • 4 cloves garlic, minced
  • 4 large tomatoes, diced
  • 1/4 cup tomato paste
  • 2 tablespoons olive oil
  • 1 tablespoon fresh thyme leaves
  • 1 tablespoon fresh rosemary leaves
  • Salt and pepper to taste
  • Fresh basil leaves for garnish

Method:

  1. Sauté the Onions and Garlic: In a large pot or Dutch oven, heat the olive oil over medium heat. Add the chopped onions and sauté until they become translucent. Stir in the minced garlic and continue to cook for another minute until the garlic becomes fragrant.
  2. Add the Bell Peppers: Toss in the cut bell peppers and cook for a few minutes until they start to soften.
  3. Incorporate the Eggplant and Zucchini: Add the eggplant and zucchinis to the pot. Stir everything together, allowing the vegetables to cook for about 5 minutes until they begin to brown slightly.
  4. Stir in the Tomatoes and Tomato Paste: Add the diced tomatoes and tomato paste to the pot. Mix well to combine all the flavours.
  5. Season the Ratatouille: Sprinkle the fresh thyme and rosemary leaves over the vegetables. Season with salt and pepper to taste.
  6. Simmer the Ratatouille: Reduce the heat to low and cover the pot. Let the Ratatouille simmer for about 20-25 minutes, stirring occasionally, until all the vegetables are tender and the flavours have melded together.
  7. Garnish and Serve: Once the Ratatouille is ready, remove it from the heat. Garnish with fresh basil leaves for added freshness and aroma.
  8. Enjoy: Ratatouille can be served as a standalone dish, over couscous or quinoa, or as a side to grilled meats or fish.

This Tomato Fried Rice is a delightful twist on traditional fried rice, incorporating the rich flavours of tomatoes and aromatic spices. It’s a great way to use up leftover rice and create a tasty and wholesome meal in no time. Enjoy the comfort and deliciousness of this easy-to-make Tomato Fried Rice!

Ingredients:

  • 2 cups cooked rice (preferably cold or at least cooled)
  • 2 ripe tomatoes, diced
  • 1 small onion, finely chopped
  • 2 cloves garlic, minced
  • 1/2 cup frozen peas (thawed)
  • 2 tablespoons vegetable oil
  • 1 tablespoon soy sauce
  • 1 tablespoon tomato paste
  • 1/2 teaspoon ground cumin
  • 1/2 teaspoon paprika
  • Salt and pepper to taste
  • Fresh cilantro or green onions for garnish (optional)

Method:

  1. Heat the Vegetable Oil: In a large skillet or wok, heat the vegetable oil over medium-high heat.
  2. Sauté the Onions and Garlic: Add the chopped onions to the hot oil and sauté until they become translucent. Add the minced garlic and continue to cook for another minute until the garlic becomes fragrant.
  3. Add the Tomatoes and Spices: Stir in the diced tomatoes, ground cumin, and paprika. Cook the tomatoes until they soften and release their juices.
  4. Incorporate the Rice: Add the cooked rice to the skillet and mix well with the tomatoes and onions. Make sure the rice is coated with the tomato juices and spices.
  5. Season the Fried Rice: Drizzle soy sauce and tomato paste over the rice and mix thoroughly to evenly distribute the flavours. Season with salt and pepper to taste.
  6. Add the Peas: Toss in the thawed peas and continue to cook the fried rice for a few more minutes until the peas are heated through.
  7. Garnish and Serve: If desired, garnish the Tomato Fried Rice with fresh cilantro or green onions for added freshness and colour.
  8. Serve and Enjoy: Tomato Fried Rice is a delicious and satisfying dish that can be enjoyed on its own or served as a side dish to accompany your favourite Asian-inspired main courses.

This Greek Salad is a classic Mediterranean dish that celebrates the fresh and vibrant flavours of ripe tomatoes and other wholesome ingredients. It’s perfect for hot summer days or any time you want a healthy and satisfying salad option. Enjoy the delightful combination of textures and flavours in this delicious Greek Salad!

 Ingredients:

  • 4 ripe tomatoes, cut into chunks or wedges
  • 1 cucumber, sliced
  • 1 red bell pepper, sliced
  • 1/2 red onion, thinly sliced
  • 1/2 cup Kalamata olives, pitted
  • 1/2 cup crumbled feta cheese
  • 2 tablespoons extra-virgin olive oil
  • 1 tablespoon red wine vinegar
  • 1 teaspoon dried oregano
  • Salt and pepper to taste
  • Fresh parsley or basil leaves for garnish (optional)

Method:

  1. Prepare the Vegetables: Wash and cut the tomatoes into bite-sized chunks or wedges. Slice the cucumber, red bell pepper, and red onion into thin slices. Place all the vegetables in a large salad bowl.
  2. Add the Olives and Feta: Add the pitted Kalamata olives and crumbled feta cheese to the bowl with the vegetables. The briny olives and creamy feta will add a burst of flavour to the salad.
  3. Make the Dressing: In a small bowl, whisk together the extra-virgin olive oil, red wine vinegar, dried oregano, salt, and pepper. The dressing should be tangy with a hint of herbaceousness.
  4. Dress the Salad: Pour the dressing over the salad and toss gently to coat all the ingredients evenly. Be careful not to crush the feta cheese while tossing.
  5. Garnish and Serve: If desired, garnish the Greek Salad with fresh parsley or basil leaves for a pop of colour and added freshness.
  6. Serve and Enjoy: Serve the Greek Salad with Tomatoes immediately as a light and refreshing appetizer or as a side dish to accompany your favourite Greek main courses, such as grilled lamb, chicken souvlaki, or moussaka.