Click here to send us an email. Click here to call us.

Author: Amy Riley

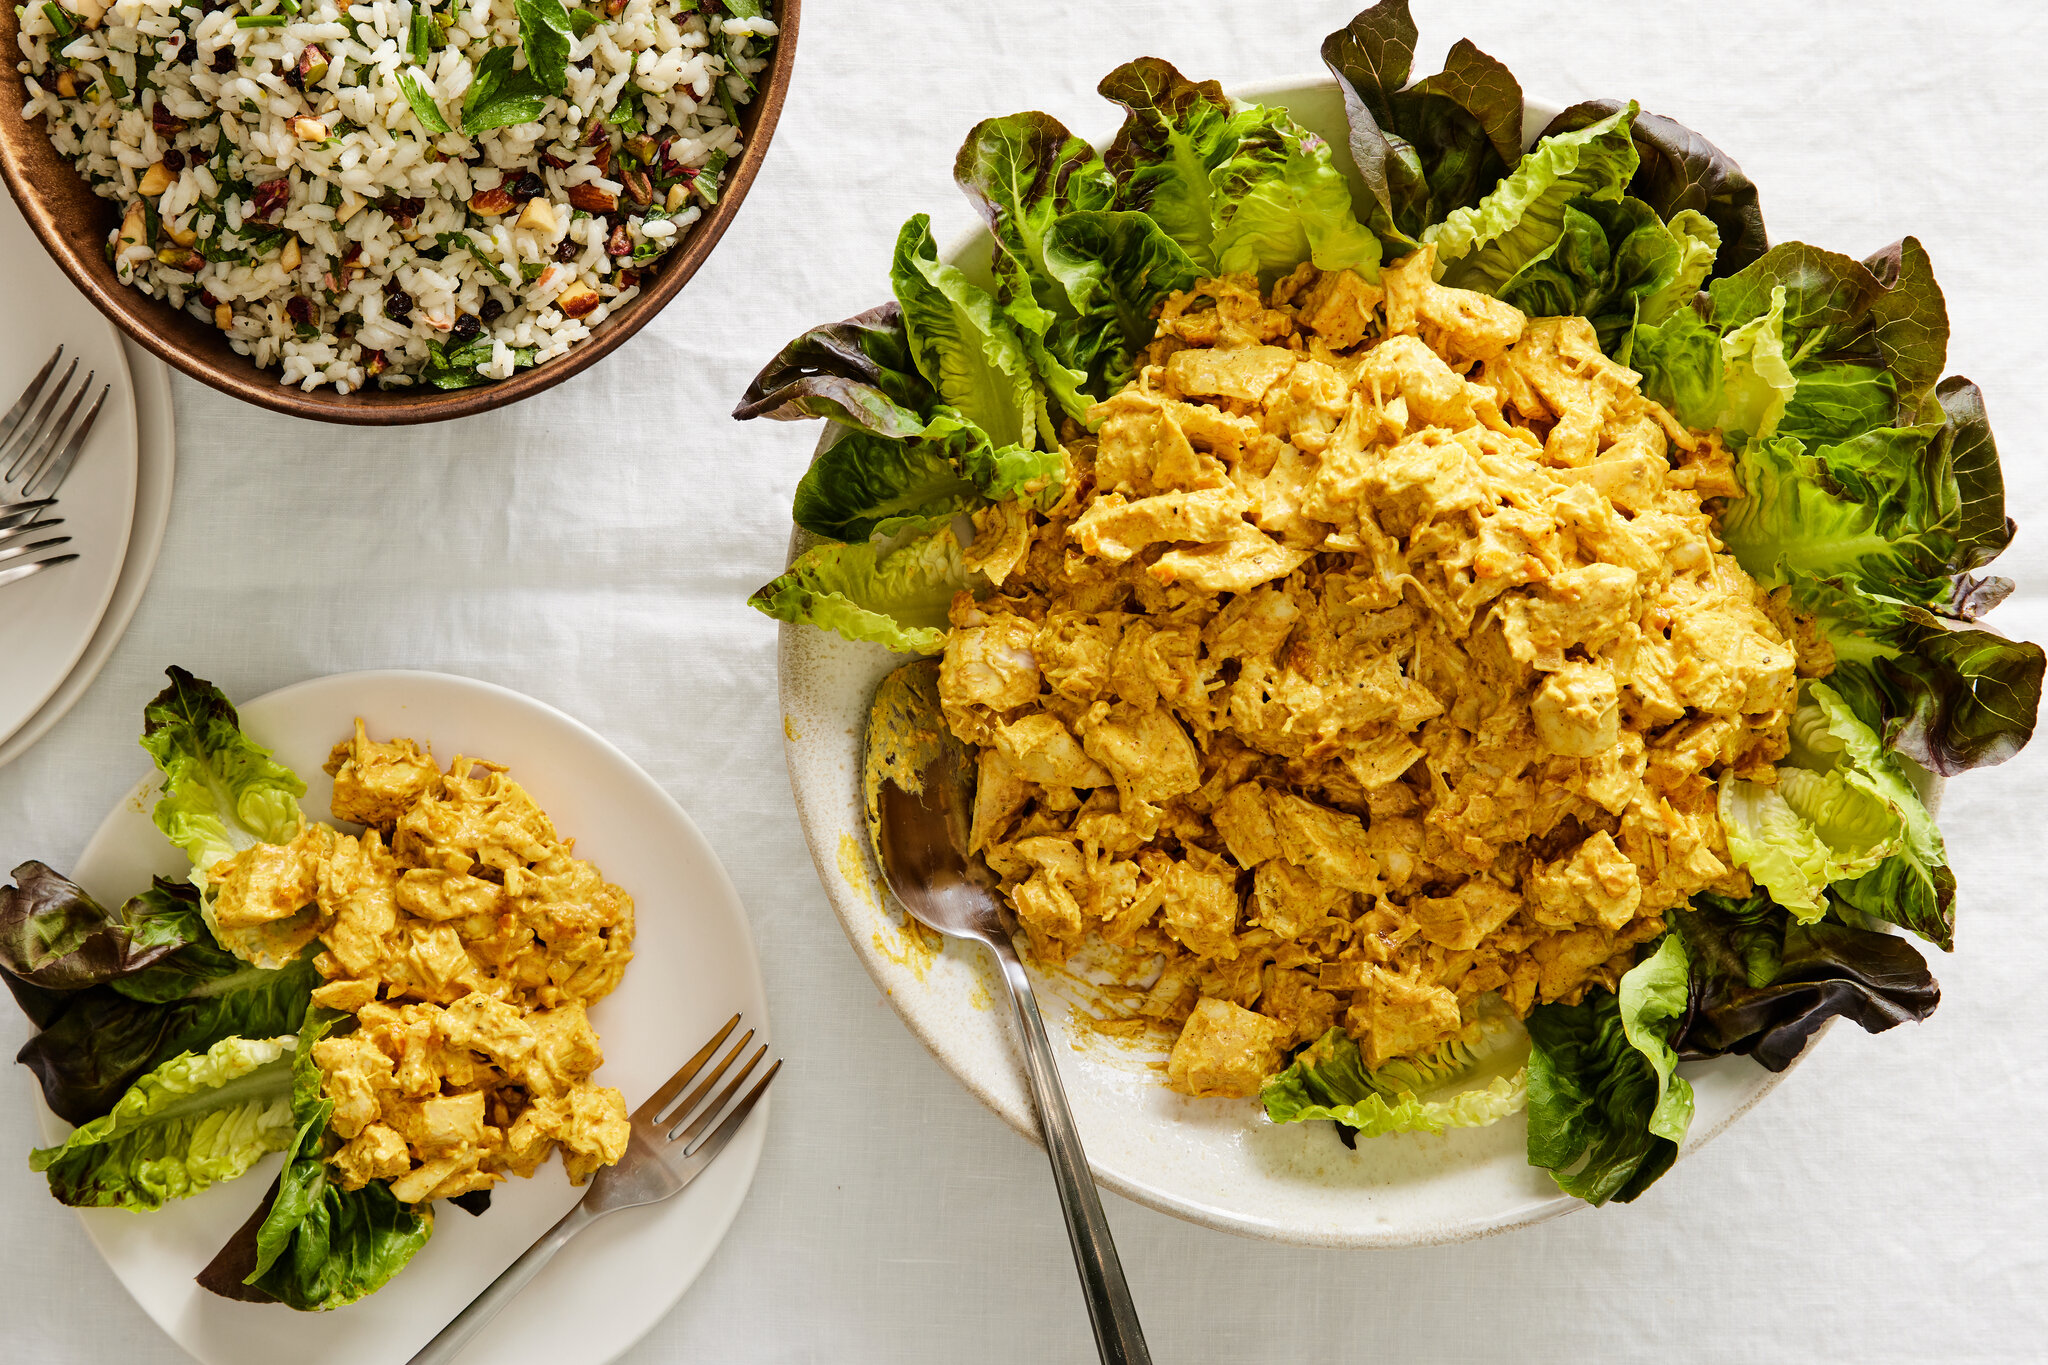
This weekend we are celebrating a monumental occasion, the coronation of King Charles III. For many of us, this is the first royal coronation we have experienced in British history so this week we are going to share with you a delicious recipe that is fit for a king and what’s more fitting than coronation chicken?

Ingredients 

  • 2 free-range chicken breasts, boned and skinned
  • 1 tbsp olive oil
  • Zest of 1 unwaxed lemon, finely chopped
  • Juice of 1 lemon
  • Knob of butter
  • 1 shallot, finely chopped
  • 1 red chilli, deseeded and finely chopped
  • 2 tsp Madras curry powder
  • 2 tbsp tomato purée
  • 100ml/3½fl oz dry white wine
  • 100ml chicken stock
  • 1 tbsp apricot jam
  • 150ml mayonnaise
  • 75ml crème fraîche
  • 1 large mango, peeled and diced
  • 4 spring onions, trimmed and finely chopped
  • 2 tbsp chopped fresh coriander
  • 3 large tomatoes, chopped
  • Dash of Tabasco sauce
  • Sea salt flakes and ground black pepper to taste
  • Green salad leaves, to serve
  • 50g flaked almonds (toasted lightly in a dry frying pan) to serve

Method:

Step 1 – First, rub the chicken with olive oil. Scatter on the lemon zest and season with salt and black pepper.

Step 2 – Steam the chicken for 20-25 minutes, or until cooked through, and set aside to cool.

Step 3 – Meanwhile, melt the butter in a frying pan, add the shallot and chilli and fry for 5 minutes. Stir in the curry powder and cook for 2-3 minutes. Stir in the tomato purée and cook for a further minute. Add the wine and continue to cook until the liquid has reduced by half.

Step 4 – Stir in the jam and stock, then continue to simmer until the liquid has reduced by half. Set aside to cool.

Step 5 – Combine the mayonnaise and the crème fraiche in a bowl until well mixed, then stir in the curry dressing. Add the chopped tomatoes,  mango, spring onions, lemon juice, and coriander.

Step 6 – Cut the chicken into bite-sized pieces. Fold this into the mayonnaise mixture. Season with salt, freshly ground black pepper, and Tabasco to taste. 

Serve up and enjoy the coronation celebrations! 

These tomato and mozzarella puffs are a snack to enjoy this spring and they’re really easy to make!

Ingredients 

  • 375g puff pastry
  • A little beaten egg
  • 270g cherry tomatoes
  • Drizzle of olive oil
  • Handful of thyme leaves
  • 125g buffalo mozzarella
  • A bunch of fresh basil

Method 

Step 1 – Preheat the oven to 220°C/fan200°C/gas 7. Then roll out the pack puff pastry to 3mm thick. Use an 8cm cutter to stamp out 12 discs.

Step 2 – Poke each disc and use to line a 12-hole tart tin. Brush the pastry with the beaten egg, then chill for 10 minutes. Spread the cherry tomatoes over a roasting tray, season, then drizzle with oil and sprinkle with thyme leaves.

Step 3 – Bake the pastry and tomatoes for 12 minutes. Divide the torn buffalo mozzarella among the pastry cases and add to the oven to melt. Then remove and spoon over the roasted tomatoes. Scatter with fresh basil leaves and serve warm.

Did you know that R&L Holt have been supplying tomatoes since as far back as 1979? But that’s not all… Keep reading to find out 5 of our most significant dates since our establishment over 40 years ago!
1979 – It all began here with the purchase of Sandylands, a typical market gardening site with indoor and outdoor areas for tomato growth.
1985 – The construction of our first glasshouse called Tom, Dick and Harry meaning that we could increase the amount of tomato plants we grew.
1999 – Our glasshouse Fred was built showing how well R&L Holt was progressing for the need of ANOTHER greenhouse to store all of our tasty toms.
2009 – Springhill Nurseries were built after a long time trying to get planning permission, we finally got the green light! The new 125m row lengths paved the way for a new challenge with NFT. This site has everything we need to produce and grow the best quality tomatoes in an environmentally friendly way. From a steam biomass boiler to an Anaeobic Digester, our Springhill Nurseries really have it all!
2020 – The Springhill Annex Solar Edge PV was introduced which enables us to power the pumps that irrigate the crops and motors to ensure that we are providing the best possible growing environment for our crops.
Have you learnt anything new from these key dates in our history? We’re sure there will be many more significant milestones to come…

Have you been trying to grow tomatoes from seeds but you’re not having much luck? Not to worry, we have 8 top tips that will help you with your tomato growing at home, who knows, you may even give us a run for our money!

Step 1 – Start Fresh

Spring is the perfect time for a fresh start by blowing away the winter cobwebs and allowing spring to flourish, so why not that include this in your tomato growing process? If you are reusing plastic module trays, wash thoroughly in warm, soapy water to remove old soil and other accumulated minerals. Also, use a new bag of high-quality seed-starting mix to help the growth of your plants. Avoid cheap imitations, which are often the cause of seedling failure.

Step 2 – Keep your containers organised

A great way to improve your seed growth at home is by organising your containers and keeping track of what plant is where. Write variety names on your containers with waterproof markers to ensure that you can clearly see which plant is where no matter the weather conditions.

Step 3 – Plant your seeds in dry soil

It is important to plant your tomato seeds dry because the furry coating on tomato seeds softens when water is added. This helps the seeds stick in place among soil particles and promotes better and healthier growth.

Step 4 – Ensure your plants have plenty of water and light

Your plants should be having plenty of water and sunlight to promote their growth. This can be done by keeping the tomato seeds at a warm room temperature and spraying them with water twice a day. In doing so, your plants should sprout within a week. Once the seedlings break the surface, move them to bright light for optimum photosynthesis opportunities.

Step 5 – Be wise when watering

Make sure you thoroughly moisten the seed starting mix, until the containers feel heavy with water. Then spritz more water over the top to ensure your plants are hydrated.

Step 6 – Don’t rush hardening off

Don’t rush the process of exposing your plants to sunlight. Instead, gradually expose your indoor-grown tomato seedlings to increased sun and wind. A good hardening-off chamber is an opaque storage bin with the lid removed, this is because your plants will then be exposed to the elements but not so much that they will be damaged. Allow at least a week for your plants to prepare themselves for outdoor life.

Step 7 – Pot your plants in stages

As your plants grow, ensure that they are in a pot to accommodate their fluctuating size. It is important that your plants have enough room to expand as they progress into a fully grown tomato plant, if they are squashed or don’t have enough room this will hinder their growth.

Step 8 – TCL goes a long way

Last and certainly not least, ensure that you are growing your tomato plants with love and handle them carefully during the growing process. Never touch the main stem of tomato seedlings, because the juicy tissues are easily bruised which can affect the growth of your plant. As long as you handle them with care, your plant will flourish into a fully grown tomato plant.

And there you have it, our top tips on growing tomato seeds! Let us know if these tips work for you, we can’t wait to see your homegrown tomatoes!

If you’re looking for an appetising addition to your spring spread, look no further, this tomato chutney is a splendid server to accompany your main meals this spring!

Ingredients

  • 1kg ripe tomatoes, chopped
  • 450g onions, chopped
  • 2 garlic cloves, finely chopped
  • 2 eating apples, peeled, cored and roughly chopped
  • 2 tsp mustard seeds
  • 2 cloves
  • 2.5cm piece fresh ginger, grated
  • 300g sultanas
  • 200g light muscovado sugar
  • 600ml malt vinegar

Method

Step 1 – Add the ingredients, except the vinegar, in a deep saucepan. Then add half the vinegar and season.

Step 2 – Place the pan on a medium heat and bring the mixture to a simmer, while stirring constantly, until the sugar has dissolved. Continue simmering for 30-40 minutes, make sure to stir occasionally, until tender.

Step 3 – Stir the vinegar into the chutney and cook for another 30 minutes, stirring often.

Step 4 – Divide the chutney into jars and set aside to cool. Store in a cool, dry place, away from direct sunlight, for at least 1 month before eating. The chutney will keep for up to 6 months so there’s plenty of time to enjoy it this spring!

We have some exciting news we would like to share with you… R&L Holt went on tour!
On the third week of March Roly travelled internationally and flew over to Detroit with group of growers from all over the world! This was a really exciting opportunity which allowed him to learn more about growers from Australia, Europe, Japan and the US/Canada. Not only did he form friendships but he also learnt a lot about other cultures and different aspects of growing in different parts of the world.
Here’s a summary of what Roly got up to on his travels and some things that he learnt along the way:
Day 1 – Ontario (Canada)
On day 1 of the trip to Ontario Roly visited the Leamington Growing area and saw tomato and cucumber crop and a propagator. This was extremely insightful and it was interesting to see how the same plants we grow here in the UK are harvested differently on the other side of the world.

Day 2 –  Niagara 

Roly spent the second day in Niagara and this visit was dedicated to the Signify Research and Development update and of course a visit Niagara Falls.

Day 3 – Cornell University (near Buffalo – USA) 

The third day involved Roly visiting Cornell University, a widely accredited university in the states that is known worldwide. He travelled here to see LED lighting trials in tomatoes.

These were a great few days away and Roly definitely learnt a lot on his travels. Who knows where our next trip will take us, but we’ll be sure to tell you all about it!

Spring has sprung!

What better way to blow the cobwebs from winter away and enjoy the fresh spring air with your loved ones than dining alfresco with some delicious food? This stuffed picnic loaf if the perfect addition to any pantry, follow this simple recipe to see for yourself…

Ingredients 

  • 1 large loaf of bread
  • 2 long red peppers (ramiro or romano), quartered
  • 8 anchovy fillets
  • 4 garlic cloves, roughly sliced
  • 4 tbsp olive oil
  • 150g unsalted butter, softened
  • Handful baby spinach, roughly chopped, plus a few extra whole leaves
  • Finely grated zest 1 lemon and a squeeze of juice
  • Handful parsley, roughly chopped
  • 2 balls buffalo mozzarella, sliced
  • 2 large heritage tomatoes, sliced
  • Handful basil leaves

Method 

Step 1 – Heat your oven to 180ºC fan/gas 6. Put the loaf on a sheet of baking paper and cut at 2cm intervals three quarters of the way through so the slices all remain joined together at the bottom but open at the top then set aside.

Step 2 – place the peppers, anchovies and garlic in a roasting tin, and drizzle with the olive oil. Roast for 25 minutes until the peppers are soft and set the peppers aside.

Step 3 – now you can begin the spinach butter. Beat the butter with an electric mixer, then mix in the spinach, lemon zest and juice, parsley, and the anchovies and garlic from the roasting tin.

Step 4 – Spread the spinach butter between the bread slices and add the peppers, mozzarella, tomatoes, spinach and basil leaves. Drizzle the oil from the tin over the top for extra flavour.

Step 5 – wrap the finished dish in baking paper and bake for 30-35 minutes. Serve straightaway for the best results!

With Easter just around the corner, you may be looking for a quick and easy starter that will impress your dinner guests and set them up for the sensational Sunday Dinner that you’ll be serving. Does this sound like you? We thought so, look no further, this easy Easter salad is the perfect starter!

Ingredients 

x3 pieces of lettuce

x5 eggs

spring onion – 3 stalks

x2 cucumbers

x4 tomatoes

For the dressing:

x1 egg

vinegar – 3 tbsp.

olive oil – 3 tbsp.

salt – 2 pinches

Honey – 1 tsp.

lemons – 1 pc.

Method 

Step 1 – prepare the dressing first. Boil the egg for about 4-5 minutes until it is a little runny. Once it has boiled, peel and place it into a blender.

Step 2 – add honey, lemon juice and olive oil and blend everything. Once blended, add the salt and vinegar. Leave the dressing in the fridge until the salad is ready.

Step 3 – Cut the lettuce into long strips and boil the other egg for 7 minutes. Peel the cucumber, tomatoes and onion and cut it into cubes.

Step 4 – After the eggs have boiled, pour cold over them and peel the egg. Cut the egg in half first, then each half in half and set them aside.

Step 5 – place all ingredients except the eggs into a deep bowl and drizzle with the dressing.

Step 6 – Mix the salad, once the salad is well mixed, arrange the eggs on top and enjoy!

Try out this tasty tomato tarte tatin for fresh tomato taste, complimented by a crisp, golden pastry for the perfect combination of taste and texture. 

Ingredients 

For filling

  • 30g butter
  • 25g caster sugar
  • 2 tbsp balsamic vinegar
  • 2 cloves garlic, finely sliced
  • 1 tsp thyme leaves
  • 650g cherry tomatoes
  • 1 tbsp capers
  • a small handful basil leaves

For pastry:

  • 210g plain flour, plus extra for dusting
  • 100g butter, cold
  • 1 egg yolk

Method 

Step 1 – To make the pastry, pour the flour and a generous pinch of salt in a large bowl. Grate in the butter and rub it into the flour with your fingertips. Mix the egg yolk with 2 tbsp cold water and stir into the mixture to make a dough. Once the dough has formed, shape into a disc, wrap and chill for 30 minutes.

Step 2 – Heat the oven to 200C/fan 180C/gas 6. Melt the butter in a 20-22cm ovenproof frying pan and stir in the sugar and vinegar. Let this simmer for 5 minutes until the mixture appears thick.

Step 3 – Take the pan off the heat and scatter over the garlic and herbs, arranging the tomatoes in one layer in the pan. 

Step 4 – Once chilled, roll out the pastry on a lightly floured work surface until it’s about 1cm larger than the pan, then put it on top of the pan, tucking it in around the edges and cutting a few small vents in the top. 

Step 5 – Bake this for 35 minutes. Once cooked, run a palette knife around the edge and leave for 5 minutes. Scatter with capers and basil.

Enjoy!

It’s that time again… It’s time to learn more about our tomato varieties!

This month we will be discussing the piccolo variety.

Here are five facts you may not have known about piccolo tomatoes:

  1. Piccolos have been the main variety in Hornsfield Nurseries for 18 years 
  2. Piccolo is a cherry on the Vine type tomato
  3. It is the most popularly variety in Northern Europe 
  4. It has a sweet and slightly acidic taste
  5. It can be enjoyed in warm or cold dishes 

Will you be enjoying a piccolo tomato in your next meal?